STATUS OF THIS STEP
start : Jan. 2014
currently in progress ( jump to latest update)
2.1 PRINCIPLE
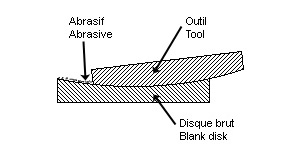
Making a telescope mirror consists in turning the flat surface of a glass disk into concave parabolic surface, whose defects are smaller than 550 nm (the wavelength of green light, to which the eye is most sensitive). In order to reach this objective, one must grind the glass surface against another disk, the tool, with an abrasive powder in between. When the mirror is on top, its center and the tool periphery get eroded. When the tool is on top, it's the other way around. After spreading some wet abrasive powder, both disk are grinded against each other until the abrasif is used (it becomes a fine mud, the grinding noise disappears). This is called a 'wet'.
|
 |
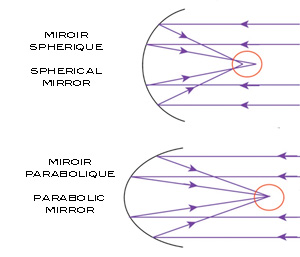
These grinding steps are repeated over and over again, until the required curvature is achieved. Finer and finer abrasive are then used, until a smooth, concave spherical surface is obtained, which is then turned into a parabolic surface. Indeed, a spherical mirror can focus in one point a near object, but it takes a parabolic surface to focus in one point an infinitely distant object.
Finally, to make it reflective, the surface must be covered in a thin aluminium layer (evaporating aluminium under vaccum, done by a professional) and only at that point we can talk about a mirror.
To clearly understand this stage of making the mirror, we need some notions of optics:
|
 |
I purchased a disk of 300 mm diameter (12 inches), and my objective is to make a mirror with focal length of 1m50 (sorry, no more inches from here, we're talking science... get metric, dudes !). This choice is based on the wish to observe galaxies and nebulae, which are faint objects. Those parameters will allow me to have a telescope that collects an optimum amount of light.
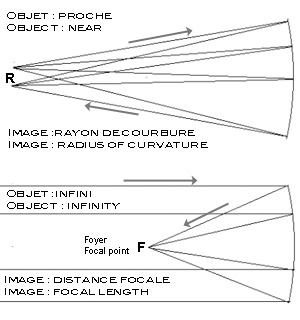
So, let's talk about optics. The ratio focal length vs diameter (F/D) defines how much light a telescope collects. In my case, it will be F/D=5 (my current telesope has F/D=10: higher ratio, less light, ie. it is more difficult to see faint objects). The focal length is the distance between the mirror and the point where light from a infinitely distant object is focused. These numbers are important as they determine until what 'depth' I should grind the surface of the disk. This depth is called the 'sagitta', and is calculated by the formula below:
sagitta = D² / (Rx8)
where D is the diameter of the disk, and R its curvature radius
The curvature radius R is the distance between the surface of a mirror and the image of a near object. It is equal to twice the focal length. Now work it out and you will find that I need to reach a sagitta of 3.75mm
|
 |
2.2 MATERIALS
| Wooden particle boards (table top) |
08.01.2014 |
second hand, online (boncoin.fr) |
| Planks (table) |
19.01.2014 |
wooden crates from local companies |
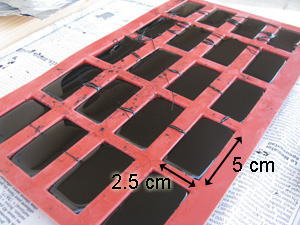
| Tiles: cérame 2.5x2.5cm x 5mm, by 30x30cm |
01.02.2014 |
DYI store |
| Epoxy resin-glue |
01.02.2014 |
DYI store |
| Basin 11 litres (33cm) |
01.02.2014 |
DYI store |
| Molding plaster "staturoc" |
22.01.2014 |
online (Rougier & Plé) |
| Raw glass disk (Suprax from Schott) |
31.01.2014 |
online (mirro-sphere) |
| Abrasives |
01.02.2014 |
Société d'Astronomie de Rennes |
2.3 TOOLS
2.3.1 Grinding stand (completed 27/01/2014)
The grinding stand or table must meet the following requirements :
- allow walking around it
- perfect stability
- its height should allow to apply pressure during the grinding phase
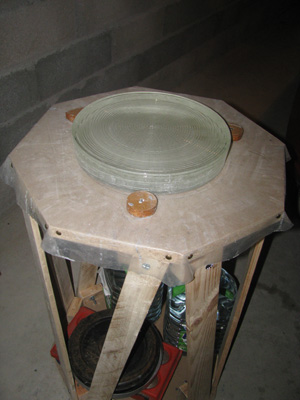
An octogonal design was chosen, and the 8 support planks can be easily changed. The diameter is 60 cm (23"), the height is 70 cm (27"1/2). This may sound quite low, but is actually fine considering the thickness of the mirror and the tool (5cm, 2" each). The horizontality of the table top is tested with a petanque ball during assembly ..
A second set of support planks are prepared so that the table is higher for the polishing and parabolisation phases, when less or no pressure is required. Three small wooden blocks keep the mirror or the tool in place (2 blocks are static, one can be adjusted). A plastic sheet and a 30cm cercle of felt are placed on top. The felt supports the mirror or tool and helps prevent astigmatism.
Stability is ensured thanks to the 8-leg-design and by means of a heavy balast (two 8-liters containers, one petanque set, and two metal disks of 5kg each, ie. about 30 kg in total).
|
 |
2.3.2 Tool for grinding and polishing (completed 07/02/2014)
The objective of grinding is to slightly hollow the face of the blank disk that will become the mirror, in order to reach the correct curvature. This is achieved by grinding a tool against the glass, with an abrasive in between. The selected type of tool is based on tiles rather than glass, upon recommandation from Frank Grière (mirro-sphere).
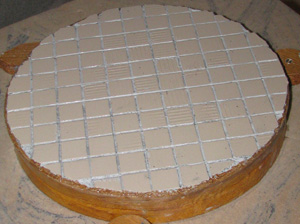
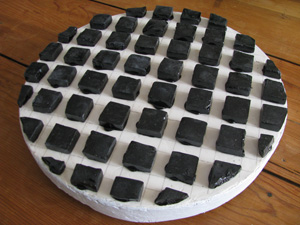
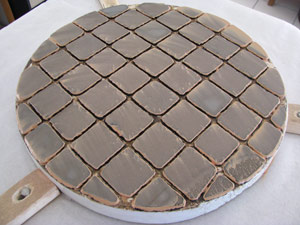
I screw together two wooden disks, whose diameters is the same as the mirror. One is laminated, I use it for the bottom of the tool. The other disk is raw : I attached on it porcelain tiles thanks to an grout-adhesive epoxy. Tiles measure 2.5x2.5cm (1") and are 5mm (1/5") thick. Tiles are sold in sheets of 30x30 cm, which ensures easy gluing and even spacing. Before being glued, tiles on the edges are cut to the right size using pliers and a good hit with a hammer. The tool must be perfectly waterproof : it is generously varnished on the side and will require frequent checks.
|
 |
2.4 GRINDING (completed 20/04)
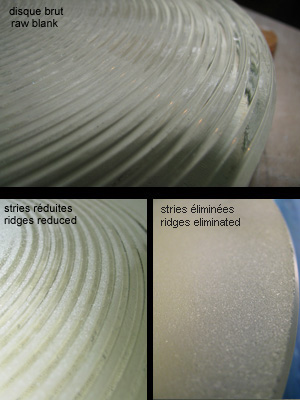
The mirror measures 300 mm in diameter, 50 mm in thickness and weights 7 kg. It is made of Suprax, which is a molded glass (as opposed to cut): in this process, they pour hot liquid glass from a thin nozzle in a rotating mold. Advantages include the absence of air bubbles, reduced internal stress, and a low thermal expansion coefficient. Moreover, the edges are round, which means an initial chamfer is not necessary. Two (temporary) inconvenients are the presence of ridges on the top and the need to flatten the bottom surface, as it is slightly convex.
These two problems are eliminated with a rough abrasive : silicon carbide 40 (aka carbo 40 or C40). A rough bottom surface also makes handling less stressful as the smooth glass was quite slippery when wet. Edges are not straight (frustroconical shape) but this should not be a problem.
09/02 : bottom surface flattened (20 wets mirror on top, 3 tool on top)
10/02 : ridges reduced (10 wets mirror on top and 8 tool on top)
15/02 : ridges removed and sagitta ca. 1 mm (18 wets mirror on top)
At this point, I have used 1kg of Carbo 40. Note that every 10 wets approximately, I empty the water from the basin and recover for re-use the roughest abrasive that settles at the bottom.
28/02 : additional two layers of varnish on the edges of the tool
01/03 : meeting Société d'Astronomie de Rennes
- advice to maintain a chamfer (whetstone)
- abrasives : C60 et C80
|
 |
03/03/2014 : 10 wets with C60, mirror on top (40 min)
04/03 : upload of this short video that makes it easier to understand the rough grinding of a blank disk (turn up the volume !). Note the 40% overhang of the mirror. The abrasive must be wet for better efficiency and to avoid glass dust. The following steps are repeated until the abrasive is reduced to a thin grey mud (one wet, ca. 3 times around the stand):
- 1 - about 6 up and down strokes
- 2 - rotation of the mirror by about 120 degrees
- 3 - move ahead one pace
These indications are approximate : it is precisely the random character of the movements that contribute to eliminate possible repeated errors.
|
|
06/03/2014 : 10 wets with C60, mirror on top (sagitta ca. 1.5mm)
07/03 : 10 wets with C60, mirror on top
09/03 : 10 wets with C60, mirror on top (sagitta ca. 1.8mm)
12/03 : 10 wets with C60, mirror on top (sagitta ca. 2.0mm)
13/03 : 10 wets with C60, mirror on top (sagitta almost 2.2mm)
used 1kg of C60
17/03 : 10 wets with C80, mirror on top (sagitta 2.2mm)
18/03 : 10 wets with C80, mirror on top
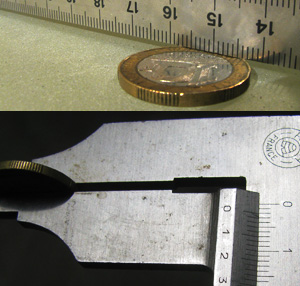
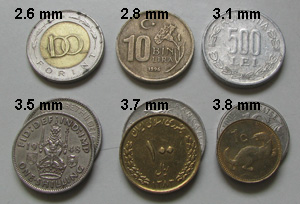
The sagitta can be measured by positionning a ruler across the mirror, and trying to slide coins of various thickness underneath. Turns out I have a collection of old French coins as well as many from various countries, that I gathered on my various trips. Pictured here an 10 Francs coin, 2.2 mm thick.
20/03 : 10 wets with C80, mirror on top (sagitta 2.3mm)
21/03 : 10 wets with C80, mirror on top (sagitta almost 2.5mm)
22/03 : 15 wets with C80, mirror on top (sagitta 2.6mm)
|
 |
A parenthesis : construction of a wooden box
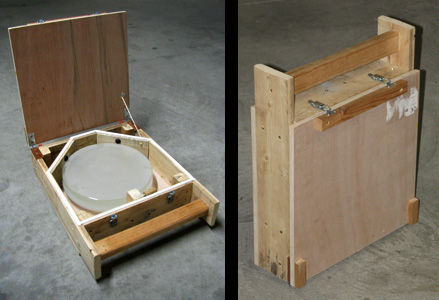
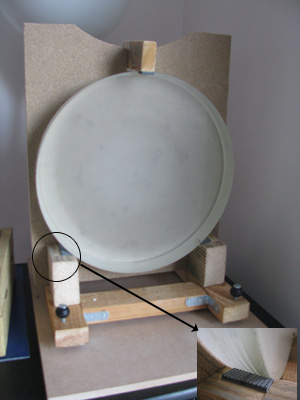
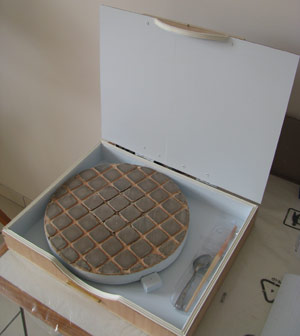
I will need to transport the mirror on various occasions, so I made a box that I can carry like a briefcase. The mirror rests face down on three small blocks of wood, so that it is easier to pick up. It is held in place firmly between two static planks at 45 degrees (back), and one removable block (front). Most parts of the box are not only held together by screws but also with epoxy.
|
 |
23/03/2014 : expoxied a 2nd layer of tiles on the tool
Focal length estimate = 2m (wet mirror, image of the sun on a wall)
24/03 : 20 wets (recycled carbo), mirror on top (sagitta almost 3mm)
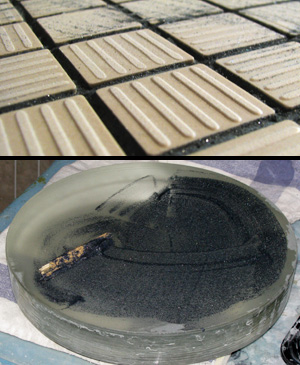
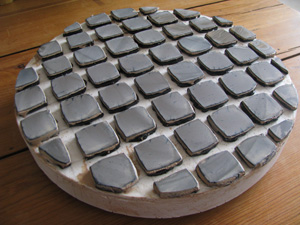
As for the first layer of tiles, I have epoxied them face down. The tiles have ridges on the back (see image on the right), but those quickly wear out and disappear. After 20 wets, only a few tiles in the center still bear ridges. The first layer was glued with a type of epoxy resin that contains silica. It was thick to spread, thus uneven, and the join between tiles was not smooth. This would make it difficult to clean the tool, which will be important later. So this time, I used an epoxy sold in two 15 ml tubes. It is clear and more liquid and spreads better, leaving a smooth clean surface when it hardens.
In order to avoid wasting some carbo between the tiles, I sprinkle it on the mirror instead of the tool and spray a little water on it. I cannot do this with the recycled carbo as it is not dry, and it is difficult to sprinkle evenly. Instead, I smear it on the mirror with a small piece of wood. There should not be too much water left on the mirror after rinsing it in the basin.
|
 |
Here are a few examples of coins used to measure the sagitta of the mirror. The thickness is determined with précision of 100th mm which is sufficient for this purpose:
2.6mm 100 Forint (Hungary 1997)
2.8mm 10000 Lires (Turkey 1996)
3.1mm 500 Lei (Roumania 1999)
3.5mm 2x 1 Shilling (UK 1948 and 1953)
3.7mm 1 Franc (France 1969) + 100 Ryal (Iran 2004)
3.8mm 1 Cent (Malta 2001) + 10 Francs (France 1986)
25/03 : 10 wets (recycled carbo), mirror on top (sagitta 3.2mm)
26/03 : 10 wets (recycled carbo), mirror on top (sagitta 3.3mm)
I have re-polished the chamfer
|
 |
27/03/2014 : 10 wets (C80), mirror on top (sagitta 3.4mm)
I am now gradually reducing the overhang, in order to reduce the curvature difference between the tool and the mirror and make it a perfect sphere.
28/03 : 10 wets (C80), mirror on top (sagitta 3.5mm)
29/03 : 10 wets (C80), mirror on top (sagitta 3.6mm)
30/03 : 10 wets (C80), mirror on top (sagitta 3.7mm)
31/03 : 10 wets (C80), mirror on top (sagitta just about 3.8mm)
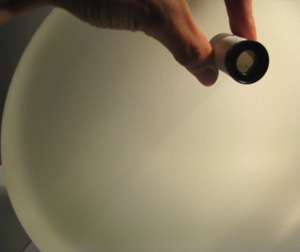
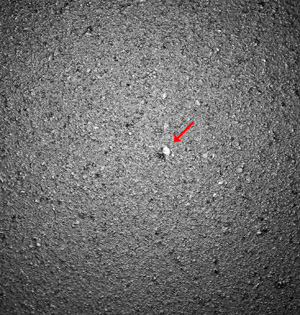
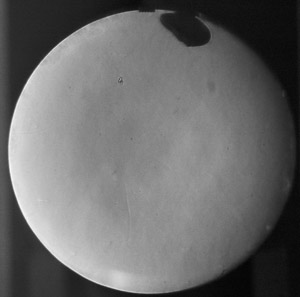
The sagitta is reached : time to check the surface. I use a table magnifier lense (got one from the Société d'Astronomie de Rennes) and close-up photos taken with a standard camera. The mirror is held on its edge and lit from behind. The surface should look "evenly uneven" but as this image shows, there are still a few deeper cuts (or pits). A few more wets will be required before switching to finer Carbo for the smoothing stage.
02/04 : chamfer repolished, 10 wets (C80), mirror on top (0 % overhang, sagitta between 3.7 and 3.8mm). Finished the 1 kg Carbo 80
surface check: still some deeper cuts (pits)
|
 |
04/04/2014 : 10 wets (recycled carbo), mirror on top (sagitta unchanged)
surface check: still a few cuts
05/04 (meeting SAR) : more Carbo 80 and some Carbo 120, and advice:
- strokes 1/3 shaped like 8 to make the surface spherical
(centered strokes tend to make it hyperbolic)
- alternate mirror on top (MOT) / tool on top (TOT) every 2-3 wets
- mark with a pencil the position of the cuts on the back of the disk
- check if cuts (or pits) disappear of if new ones appear
07/04 : 8 wets C80 (alternating 2 MOT - 2 TOT)
For all TOT wets, a 5kg steel ring is placed on the tool so that TOT and MOT do an equal job
10/04 : 8 wets C80 (alternating 2 MOT - 2 TOT)
surface check: fewer and shallower pits, no new ones
11/04 : chamfer repolished,
8 wets C80 (alternating 2 MOT - 2 TOT)
surface check: 3 pits left, sagitta 3.8 mm
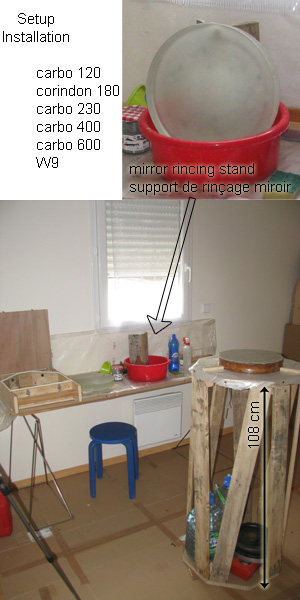
12/04 : raised polishing table to 108cm (new set of planks)
13-14/04 : 16 wets C80 (alternating 2 MOT - 2 TOT)
surface check : one of the 3 pits is gone, but there are still a few small ones. Sagitta between 3.7 and 3.8 mm
15-16/04 : 4 wets C80 and 8 recycled (alternating 2 MOT - 2 TOT)
surface check : smoother, a few shallow pits left
18/04 : 4 wets recycled carbo (alternating 2 MOT - 2 TOT)
chamfer repolished, surface unchanged : moving to Carbo 120
|
 |
2.5 SMOOTHING (completed 30/06/2014)
Objective : to obtain a spherical and smooth surface.
Method : finer and finer abrasives are used, making movements like an 8 and without applying any pressure.
Control : a surface check is done after each series of wets (6 to 12).
8-shaped strokes
|
How to place the mirror on the tool
|
In order to avoid contamination and risk of scratches by rough Carbo used during the grinding steps, the polishing table is moved from the garage to the appartment and raised to 108 cm. The tool is carefully cleaned using an old toothbrush, and new blocks and a new plastic sheet are placed on the polishing table.
21-22/04 : 18 wets C120 (alternating 3 MOT, 3 TOT)
Some of the outer tiles have rather sharp angles, which I think were responsible for the new pits in the previous steps. Using a whetstone, I made a slight bevel (chamfer) on the edges of the peripheral tiles.
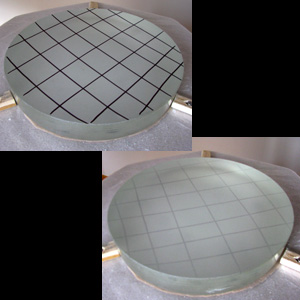
To test if the curve of the mirror is a sphere, a simple test is to draw a grid pattern on the glass surface, with a waterproof felt pen and to do just one wet. If the lines are evenly worn out, it means the curvature of both mirror and tool match and make a spherical shape. The abrasives 120 and 180 are sprinkled on the surface using a salt pot, and then sprayed with water.
|

|
23-25/04 : 26 wets C120 (alternating 3 MOT, 3 TOT)
Sagitta unchanged. Focal length 1m50 (image of the sun / wet mirror)
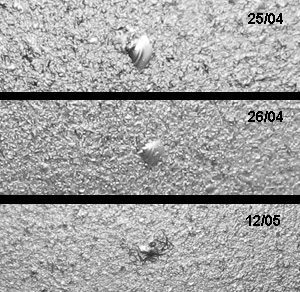
Surface check : one major new pit (see image) ... argh...!
26/04/2014 : 6 wets C120 (alternating 3 MOT, 3 TOT)
Surface check : that pit looks a little smaller (note that the scale between the two photos may differ, but the shape of the pit surely did change. There is hope...)
27/04 - 03/05 : vacations
03/05 : meeting SAR : advice + Carbo 180 and 230
05/05 : chamfers redone, 6 wets C120 (alternating 3 MOT, 3 TOT)
07-08/05 : 12 wets C120 (alternating MOT / TOT)
Sagitta check : still between 3.7 and 3.8 mm
Curvature match : OK
Surface check : a few pits still remains
12/05 : 6 wets C120 (alternating MOT / TOT)
Surface check : previous existing pits almost gone, a few new small ones. Globally smoother as it's ever been so far. That'll do nicely, let's switch to next grade : 180 !
|

|
13-14/05 : major clean up in maniac-mode, in order to avoid remaining grains of Carbo 120. The tool is washed, brushed and washed again. I noticed some small holes due to bubbles in the epoxy between the tiles, where some abrasive was trying to hide. Those littles holes were scratched, cleaned, and sealed with superglue. All work surfaces were washed with a sponge, hoovered and washed again. The floor and the bottom of the polishing table were hoovered as well. The few planks on which I rest the tool and the mirror were brushed clean of abrasive, and painted over.
|
|
15/05/2014 : 12 wets Corundum 180 (alternating MOT / TOT)
Curvature match : after 1 wet TOT, lines in the center remain
Surface check : much smoother, some small pits still remain
Chamfers redone
16/05 : 6 wets Corundum 180 (alternating MOT / TOT)
17/05 : 6 wets Corundum 180 (alternating MOT / TOT)
Surface check : residual pits gradually disappearing
19/05 : 12 wets Corundum 180 (alternating MOT / TOT)
20/05 : 12 wets Corundum 180 (alternating MOT / TOT)
Surface : almost OK
Curvature match : after 1 wet MOT, some lines remain towards the edge, and they get erased after 1 wet TOT. Inversely, after 1 wet TOT, some lines remain visible towards the center, and they get worn out after 1 wet MOT.
21/05 : 6 wets Corundum 180 (alternating MOT / TOT)
22/05 : 12 wets Corundum 180 (alternating MOT / TOT)
Surface : a few new pits, one or two previous pits left
Curvature match : lines get erased more evenly
23/05 : 12 wets Corundum 180 (alternating MOT / TOT)
Surface : as smooth as it's ever been, few small pits
Curvature match : regular checks every 3 wets. Difficult to obtain reproducible results. Sometimes it seems that lines are quite evenly worn, yet other checks reveal lines in the center are worn less. Seems to depend on the amount of abrasive and water.
24/05 : 12 wets Corundum 180 (alternating MOT / TOT)
Surface : a few new pits
Curvature match : regular checks every 3 wets. No marked improvement. MOT, looks quite good, but TOT, lines in the middle remain more visible than near the edge.
25/05 : 12 wets Corundum 180 (alternating MOT / TOT)
29/05 : 11 wets Corindon 180 TOT
Curvature match : lines still persist more in the middle
01/06 : 1 wet Corindon 180 MOT (lines remain towards the edge) followed by 1 wet TOT (the remaining lines are worn out). As there is no change, let's move on to 230.
|

|
02-03/06 : clean up, chamfers redone, supports painted over.
04-05/06 : 12 wets Carbo 230 (alternating MOT / TOT)
07/06 : last SAR meeting before Sept. Stock of advice, as well as C400, C600, W9, Cerium Oxide and pitch
09,12/06 : 12 wets Carbo 230 (alternating MOT / TOT)
Surface check : still a few pits
14-15/06 : 12 wets Carbo 230 (alternating MOT / TOT)
Surface check : previous pits have disappeared but there's a new one, quite noticeable
16/06/2014 : 6 wets Carbo 230 (alternating MOT / TOT)
Surface check : good, the remaining pits are very small, that'll do, moving on to C400
17/06 : total clean-up (see 13/05)
18-19/06 : 12 wets Carbo 400 (alternating MOT / TOT). Since this abrasive is very thin, it is mixed with water in a small jar and spread using a paintbrush
Surface check : after only 6 wets, the progress is obvious: the surface is much smoother. After 12 wets, it's hard to see the tiny pits that still remain.
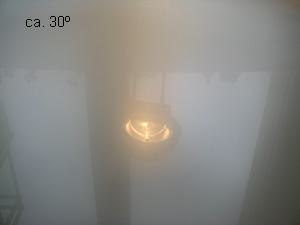
21/06 : reading documentation and collecting advice for the steps to come. I see on the French forum astrosurf that the specialists of tile tools recommend to do 400 600 and W9 one after the other without waiting. The reason is that the epoxy is subject to temperature and humidity, and this can affect the match of mirror and tool. I will wait to have the time to do it all the same day, or at least on consecutive days with similar weather conditions. The last wet of each grade should be extended (adding water) in order to get closer to the next grade (also an advice from astrosurf). The quality and uniformity of the fine grinding steps can be checked by looking at the reflection of a light bulb (see aviatechno).
|
|
28/06/2014 : 4 wets Carbo 400 (alternating MOT / TOT)
Surface check: excellent
Clean up of all surfaces
10 wets Carbo 600 (alternating MOT / TOT)
Clean up of all surfaces
10 wets W9 (alternating MOT / TOT)
Surface check : some small pits remain
30/06 : 14 wets W9 (alternant MOT / TOT)
Surface check : excellent, remaining pits are really tiny
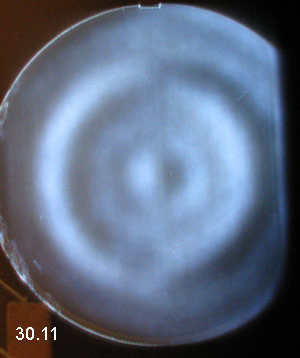
This is it for the smoothing step. The mirror is still "gray" (not polished), and the next step will involve yet a very very fine powder to make it perfectly polished, reflecting and spherical. At this point, it nevertherless reflects the coil of a light bulb, which allows me to check that the surface is evenly smooth (see photo).
|

|
2.6 POLISHING (completed 02/01/2015)
The objective of this step is to obtain a surface which is perfectly smooth and perfectly spherical. In order to achieve this, we don't use the same abrasives as earlier, but cerium oxide (a very fine powder). The tool is also different : instead of tiles, we use pitch (a visco-elastic material derived from the resin of certain trees). A new tool is made by moulding plaster directly onto the mirror so it has the same curvature. Then pitch squares are placed onto the tool.
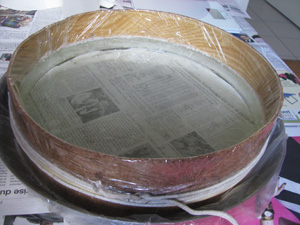
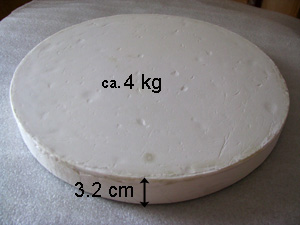
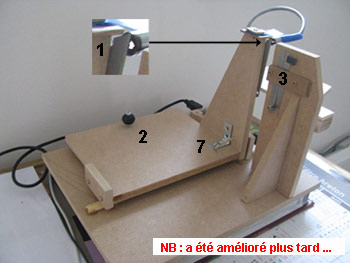
08/07 : moulding the tool using Staturoc (a moulding plaster sold in France, it is dense, hard and most of all waterproof). Cooking oil is smeared on the mirror, which is then covered with 2 sheets of cling film, ensuring there are as few air bubbles as possible. A dam is wrapped around the mirror. A little parafin is smeared in the chamfer of the mirror to later ease the separation of tool and mirror and to make the dam water-tight. 940 ml of ice cold water are poured in and 4kg of plaster are sprinkled over. The first 2 kg sink in the water, then it starts accumulating on top. At this stage, mixing and breaking lumps is done by hand while the rest of the plaster is poured (see video). This is a two-man-job : one keeps pouring the plaster, the other mixes. After 5 min, a smooth, homogeneous mixture is obtained. It is thick like yoghurt, but liquid enough to create a flat surface. The plaster sets within 15 min, and the dam can be removed after an hour or two. I waited 3 hours to separate the tool by gently sliding it across the mirror. The few dips you can see are due to air bubbles trapped between the cling film and the mirror.
|


|
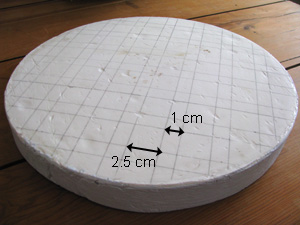
10-12/07/2014 : preparation of the pitch. It comes as a bar of roughly 20x10x3cm, of which blocks are broken off and melted in a dedicated old pan (you don't want to cook pasta in there afterwards). The liquid pitch is then poured in the heat-resistant plastic mould shown in the photo (chocolate, anyone ?). Hot pitch is liquid, gives off nasty vapors (better handle it outside), it becomes very sticky when it cools (watch your clothes), before becoming hard and brittle at room temperature (scattering bits and pieces all over the place). The blocks are then cut up with a hot blade. The tool is prepared to receive the pitch squares by drawning lines as illustrated on the photo and the surface is smeared with candle wax. The pitch squares are held above a candle flame just enough time to melt a little the surface, and they are then stuck on the tool. They do not all have the same thickness (ca 0.8 - 1 cm) but they will be pressed to match the mirror curvature later.

So that the pitch squares have a surface that matches the surface of the mirror, they have to be pressed. This is done by placing the mirror on top of the tool, with a sheet of baking paper in between. The mirror can be warmed up to make it faster. I let mine at room temperature, and left it on the tool for about 4-5 hours. The squares that overhang or are too close to one another are cut a little. I weighed the mirror again and more precisely, now it has the pitch on it : 5 kg.
13/07 : 1h30 polishing (strokes: 8-shaped, slow, smooth, overhang 1/3 D), alternating MOT/TOT every 15 min. Some cerium oxide powder is mixed with a little water and smeared on the pitch using a paintbrush. Adherence is quite strong, and the work takes much more effort than smoothing. However, the soft wistling sound it makes is a long way from the awful SKRRR SKRRR of the rough grinding. It is important to add cerium mix or just water from time to time, by just shifting the tool or mirror aside, no need to separate them.
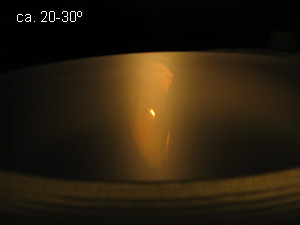
- Result : the surface is becoming reflective, both at the center and near the edge according to the light-bulb test (angle 30 degrees). You can even see the reflection of the desk-lamp itself (see photo) and the outline of the window frame.
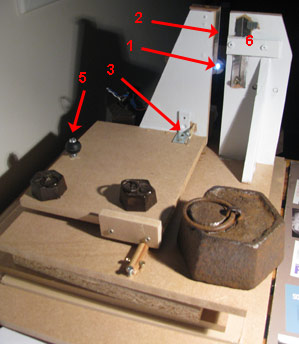
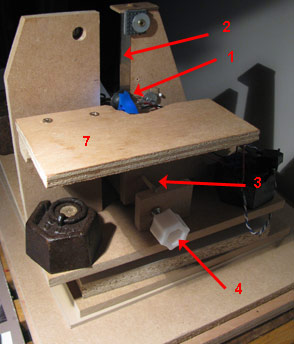
- Start of construction of a Foucault tester.
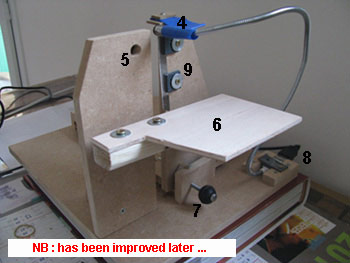
15/07 : Foucault tester completed for visual observation with two options : slit mode (classic Texereau) or slitless mode)
16-18/07 : Foucault improved with a platform to position a camera or a webcam. Testing attempts suggest that fine-tuning will take a little more time, and requires that the mirror is further polished (1h30 is probably not enough time to obtain a decent image with the Foucault tester).
|


|
19/07/2014 : getting the pitch tool ready for this weekend's polishing. I had to cut the edges of the pitch squares to enlarge the channels between, because they had spread a little since last weekend. Then I warmed up the mirror and left if for 10 min on the pitch tool, which was too long : now I need to re-cut many of the channels. Temperature too hot in the afternoon, the pitch sticks to the cutter blade. Tool in the fridge till next day.
20/07 : cloudy morning, temperature not too high. 3 hours to dig the channels again, just in time before the sun came out. The tool will now be stored in the fridge between two polishing sessions so that the pitch stays in shape.
1h polishing (35 min TOT, 25 min MOT).
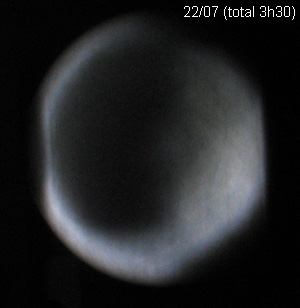
22/07 : 1h polishing (25 min MOT, 35 min TOT). On the Foucault image (slitless mode), the left and right edges are cut off for some reason, probably due to a too long distance between the camera lense and the knife edge.
02/08 : cut pitch squares a little, pressed for 2hrs room temperature, 1h polishing (25 min MOT, 35 min TOT).
06/08 : cut pitch squares a little, pressed for 2hrs room temperature, 1h polishing (25 min MOT, 35 min TOT).
|

|
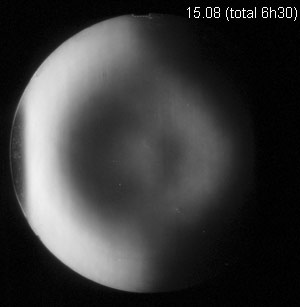
17/08/2014 : cut pitch squares a little, pressed for 2hrs room temperature, 1h30 polishing TOT. Scratch still present. Advice (SAR + astrosurf) : keep on polishing to remove the "grey" and worry about the shape and Foucault later.
24/08 : cut pitch squares a little, pressed for 2hrs room temperature, 2h polishing alternating every 30 min. Now I have a 2kg weight to place on the tool when doing TOT, since the tool is 5kg vs mirror 7kg. Scratch still present.
31/08 : cut pitch squares a little, pressed for 2hrs room temperature, 2h polishing TOT. Scratch still present + another small one nearby. NB: nice conjunction Moon - Saturn this evening, less than 0.3 degrees. On the right, the tool after 12hrs polishing: the pitch squares are now barely 3mm thick.
|

|
05/09/2014 : cut pitch squares
06/09 : meeting SAR miror workshop. Confirmed the surface state (collègues' Foucault tester) : mirroir too deep, hill in middle, turned edge, 8 mm longitudinal aberration. Advice to work TOT, Foucault-check every 2hrs and shorter strokes (less overhang). 1h polishing TOT.
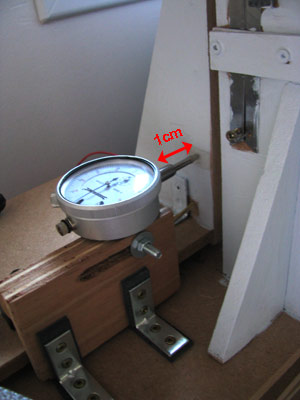
18/09 : improvement of the Foucault tester: installation of a dial indicator. For a smoother motion, I glued some hard smooth plastic bands where the acorn nuts of the moving part meet the static part of the tester. The result is positive: the needle of the indicator moves very smoothly.
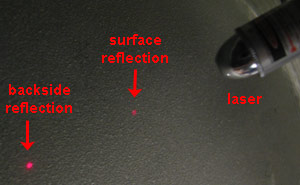
Test of the polishing using a red laser (a toy of my neighbour's cat) : the reflection on the surface is clearly visible (due to scattering of light), this means that the polishing is not finished.

|

|
19/09 : cut pitch squares
20/09 : 2 hrs polishing TOT and check with Foucault tester: the central hill has been reduced.
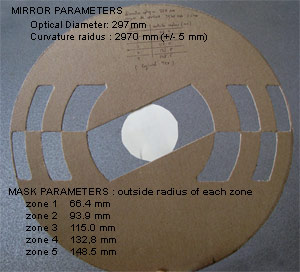
22/09/2014 : I made a cardboard Couder mask based on the dimensions recommended by the Texereau method (calculations made by Pierre Strock's Excel file). This file also analyses the readings of the indicator (multiplied by 2 since I have a mobile light source). There are other softwares but this one is interesting because there is a parameter "reversed indicator" when readings get smaller as the knife edge moves away from the mirror.
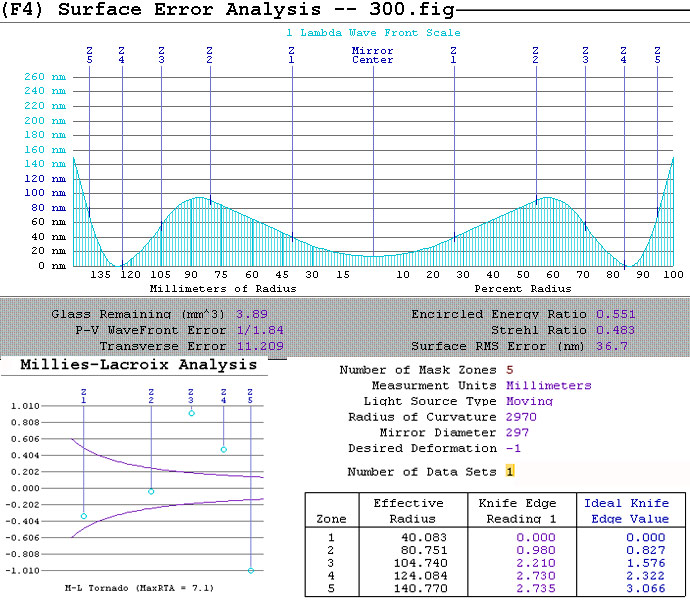
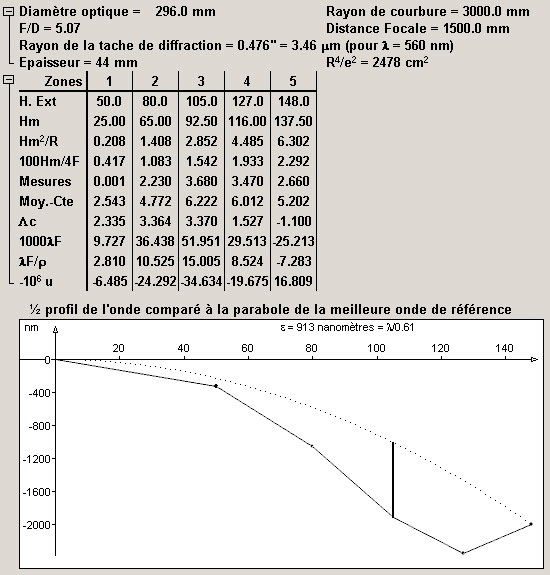
23/09 : Results from two measurements on one axis (marked) seem to be fairly consistent. The graph below, taken from the Excel result file, shows that there is a fair amount of glass to remove in zones 3 and 4 before I reach the dream parabola... It is difficult to take a photo of the observations with the Couder mask. The image below shows the neutral or nulled or grey shade in zone 2.

24/09/2014 : advice from Abdel (forum astrosurf) to use software that don't include an option for reverse readings : multiply readings by -1 and add the initial reading of the central zone. Advice from Michel (forum SAR) : use FigureXP and/or Bulco.
26/09 : cut pitch squares
27/09 : 1 hr polishing TOT
28/09 : 2 hr polishing TOT + 1 hr polishing MOT
01/10 : cut pitch squares
04/10 : meeting mirror workshop at the SAR : modified the Couder mask (added a central cardboard disk in zone 1). Mirror control: the central 1/3 needs further polishing. Mesurements with the Foucault-tester are consistent with my own measurements. After 20 min polishing MOT, new control (not much change). Explanations by Michel of the Millies-Lacroix analysis: I have two data-points within the limits (purple lines). Advice for the next steps : 30 min MOT and 30 min TOT, then new measurements.
|

|

There is still some 'haze' (unpolished surface) according to the red-laser test, therefore more polishing is required before worrying about getting a parabola. At least I am able to make and analyse measurements with the Foucault tester.
13/10/2014 : 1 hr polishing (30 min TOT et 30 min MOT)
15/10 : advice from Michel (SAR) : 30 min MOT (done)
17/10 : 1 hr polishing M/O.
01/11 : 1 hr polishing MOT
02/11 : 1 hr polishing MOT
05/11 : 1 hr polishing MOT
08/11 : meeting SAR. 1 hr polishing MOT. Foucault test => need to deepen the center. Still some 'grey / haze' : advice to continue 3 hrs MOT, then check again.
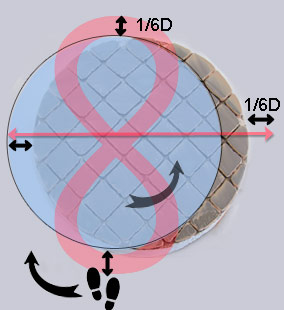
A note about the polishing stroke : I make eights with an overhang of 1/6D left, right, front and back (hence in total 1/3D in each direction) as illustrated on the right. After a few eights, the mirror is rotated in one way while I make a step the other way.
|

|
09/11/2014 : I moved the Foucault setup : it is now along a wall with no window (there were air turbulences in my earlier setup). In addition, I measured the distance of the mirror center to the wall, and positionned the knife-edge at the same distance. I also aligned the edge of the moving plateau parallel to the wall. I ran a test measurement : moving from zone to zone, I barely need to move the knife-edge, so my alignment is quite good. Some weights will keep things in place.
10/11 : 1 hr polishing MOT
11/11 : 1 hr polishing MOT. The tool now also has its box, so it can be stored safely away from any dust between polishing sessions.
15/11 : 1 hr polishing MOT
16/11 : checked mirror with Foucault tester : now much nearer to a sphere. Still some haze.
19/11 : 1 hr polishing MOT
25/11 : 1 hr polishing MOT
27/11 : cut pitch squares
30/11 : 2 hr polishing MOT (total up to this point : 30 hrs polishing)
A check with the Foucault tester reveals that the shape is spherical but there are some zones that will require more polishing. In any case, there is still some 'haze' though it is gradually clearing. Advice from Michel (SAR): alternate 8 and W strokes, and work more than 1 hr in a row to make better use of the thermal equilibrium tool-mirror. I had yet another look in the Texereau book, which mentions that the pitch temperature should near 20 degrees. This is confirmed by a colleague from the Astrosurf forum, who had a similiar experience regarding the surface because the pitch was too hard
04/12 : 2 hr polishing MOT alternating 8 and W strokes, after having slightly warmed up the mirror (in the oven). I also pushed up the heater a little bit, and I pressed for 20 min moving the mirror from time to time to avoid it sticks to the tool.
05/12 : checked mirror with Foucault tester : no improvement
06/12 : meeting SAR. Warm-pressed and polished for 2 hours MOT alternating 8 and W. Check with Foucault tester : the surface looks better (surface error from the sphere around 300 nm). Michel confirms the polishing is good enough, and I could even move on to the parabolisation.
13/12 : cut pitch squares, warm press, 2 hr polishing MOT alternating 8 and W strokes. Foucault test : not a big difference.
14/12 : warm press (not quite warm enough, took more time than yesterday to get it running smoothly). Twice 6 times around the table using strokes described by Texereau p.77, Fig. 48 #12 for a raised ring. Foucault-test after leaving the mirror rest for 1h : going in the right direction
02.01.2015 : warm press. 1h30 alternating strokes in W, strokes in 8 and 6 times around the table with strokes from Texereau p.77, Fig. 48 #12. Checked the surface : not much change. As Michel said at the last meeting, it's close enough to the sphere to start the parabolisation.
|


|
2.7 PARABOLISATION (started 03/01/2015, cancelled 06/02/2016)
|
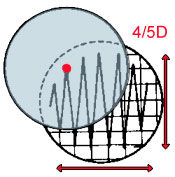
Parabolisation (also called figuring) is achieved MOT, using normal W strokes with an overhang of 4/5D according to Texereau (p. 81 / A). As represented below, the center of the mirror makes a series of W over the tool.

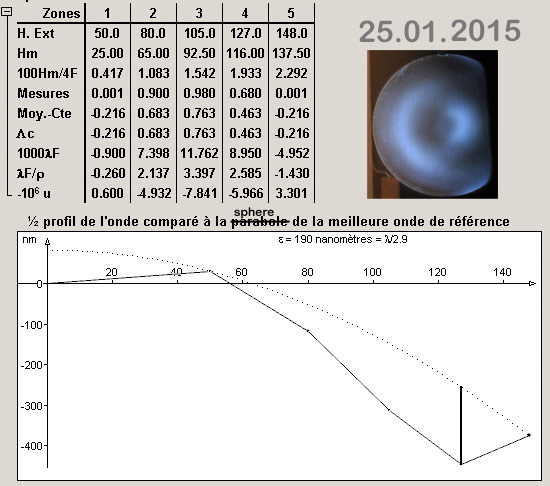
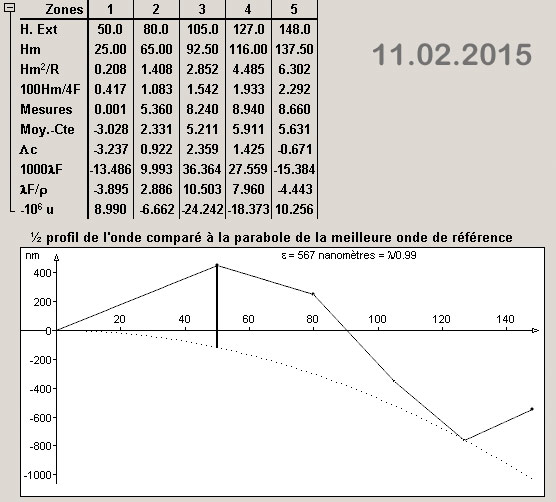
The objective is to deepen the center and flatten the edge. The tool is warm pressed before and measurements are done after 30 or 45 minutes work, having let the mirror rest for at least one hour on its stand. One set of measurements is collected from zone 1 to zone 5 (#3) and another the other way around (#4), in order to obtain an average set. The Bulco software does not handle mobile source nor reversed indicator. Therefore, measurements are formated as follows : x -1, + measurement zone 1, x 2. The resulting profile is compared to the dotted line, which represents the ideal parabola.
03.01.2015 : warm press. 30 minutes normal parabolisation strokes. 1hr resting on stand. Measurements. 45 mins normal strokes. 1hr rest. Measurements.
|


|
|
09.01 : cut pitch squares
10.01 : meeting SAR. Warm press. Checked mirror : need to deepen zones 3 and 4. Polished 2 hours using 8 and W strokes 1/3D TOT. Checked again : slight improvement. Advice from Michel to continue with 8 or W 1/3D MOT.
17.01 : warm press. 1 hr polishing doing strokes in 8 and W 1/3D MOT. Checked with Foucault tester : not much change.
18.01 : cut pitch squares
24.01 : warm press. 2 hrs polishing doing strokes in 8 1/3D MOT. Result : nicely got back towards the sphere.
25.01 : warm press. 3 hrs polishing doing strokes in 8 1/3D MOT. Result : getting closer but zones 3-4 too high (epsilon 200 nm)

|
|
06.02.2015 : re-channeled the tool
07.02 : SAR meeting. Checked the mirror. Close enough to sphere to parabolise. 30 min standard parabolisation strokes. Turns out this leveled the remaining zone to very near a perfect sphere. Then, 3 times 10 min standard parabolisation strokes with Foucault checks. End of the day: great progress as zone 1 and 2 are fine, now need to work on outer zones. Recommendation from Michel : twice around the table using strokes described in Texereau p. 81, Fig. 49 (A-III), then check again. Another recommendantion: the padded plastic I had placed on the polishing table was fine so far, but with the long parabolising strokes, the tool needs to be more steady. I have to remove it and place just a few sheets of paper towel.
08.02 : twice 2 turns around the table doing strokes described in Texereau p. 81, Fig. 49 (A-III). The mirror is allowed to rest for 1 hour on its stand before measuring. Results consistently show reduction of zones 2-3-4 as expected.
09.02 : reinforced the polishing table, which was squeaking and moving a little too much, by adding a screw in addition to the bolts on each foot (those parabolisation strokes generate even more strain than the polishing 8 strokes). Room temperature press (took a while), then 4 times around the table doing strokes as in Texereau p. 81, Fig. 49 (A-III). Measurements : going in the right direction, but the surface looks a little less smooth.
10.02 : warm press, 4 times around the table, same strokes as above. Measurements : gone too far
11.02 : warm press, twice around the table, strokes 8 MOT with overhang 1/3D, testing going back towards sphere, but looks like parabola gone even a little further. See Bulco result below.
14.02 : warm press and upon advice from Michel, strokes in 8 with 1/3D overhang but TOT this time ! First twice around the table, then rest and measurement : improvement. Then 4 times around the table. Rest. Measurement : worse!?. 4 times again. Measurements next day: worse.... Advice from Michel : keep going, same strokes, has to go back towards sphere.

15.02.2015 : warm press. 4 times around the table O/M, strokes in 8, 1/3D. Rest. Mesurements. Not much change
28.02 : warm press. 30 mn around the table O/M, strokes in 8, 1/3D. Rest. Mesurements. Not much change. 1 hr around the table O/M, strokes in 8, 1/3D. Rest. Mesurements. Not much change.
01.03 : warm press. 30 mn around the table O/M, strokes in 8, 1/3D with a weight of 5kg on top of the tool instead of 2kgs. Rest. Mesurements. Not much change.
07.03 : meeting SAR. Measurements confirm that the center is too deep. 30 min TOT, 1/3D with a weight of 5kgs on top of the tool. Small improvement (zones 2-5 reduced a little). 3 times around the table using strokes described in Texereau p. 81, Fig. 49 (A-III). Measurements : zones 3-4-5 have become spherical. Recommendation from Michel : same strokes, twice around the table, applied on zones 2-5. As these zones are reduced, it will lessen the central hole.
Readings at the end of the day, from zone 1 to 5 : 0 - 5.41 - 8.64 - 8.64 - 8.64
10.03 : warm press. Twice around the table with 5cm W strokes from zone 2 to 5 (Texereau p. 81, Fig. 49 (A-III). Rest 30 min. Readings (normalised) : 0 - 5.0 - 8.1 - 8.76 - 8.44.
Same again. Rest. Readings : 0 - 5.0 - 7.98 - 8.64 - 8.44 (epsilon = 538 nm). Slowly going in the right direction. These strokes "push" glass from zone 2 towards the edge.
20.03 : warm press. Twice around the table with 5cm W strokes from zone 2 to 5 (Texereau p. 81, Fig. 49 (A-III). Rest 30 min. Readings (normalised) : : 0 - 5.14 - 7.92 - 8.76 - 8.4.
Same again. Rest. Readings : 0 - 5.4 - 8.04 - 8.88 - 8.56 : not better.
|
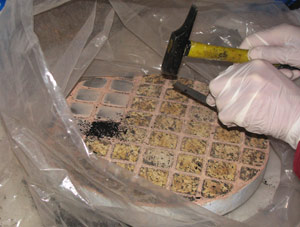
24-25.03.2015 : the pitch squares had become too thin (about 1 mm), so the tool was stripped bare using a hammer and a cutter blade. The tool, placed on 3 small pieces of wood, was wrapped in a large plastic bag to contain the mess. Note the latex gloves as pitch is sticky when warm on fingers... Similar precautions are taken any time the tool needs to be rechanneled.
29.03 : new layer of pitch squares (melted pitch, poured in the mold, cut rectangles in half, stuck the squares on the tool, pressed a first time with the quite warm mirror and a sheet of baking paper). Small incident : the sheet of baking paper shifted and some pitch stuck to the mirror. Solution : olive oil.
30.03 : cut pitch squares and carefully rinced the tool.
04.04 : SAR meeting. Warm pressed. Twice around the table (same W strokes as above). Measurements. Not much change. 20 min. Small improvement. 30 min. Small improvement.
|

|
11.04.2015 : warm press. Continuing TOT with strokes in W between zone 2 to 4. 30 min: not much change. 4 times around the table with a 5kg disk on top of the tool: not much change. 20 min with 5kg weight: zones 3-4 sligtly reduced. 30 min with 5kg weight: zones 2-3 slightly reduced. Seems to be going in the right direction, but very slowly. 30 min: the trend appears to have reversed, it's now no better than at the beginning.
12.04 : I think I was not providing enough support with the left hand, and not applying enough pressure with the right hand, on the edge of the tool that is working on zones 2-4. Cold press. 20 min this time not with the centered 5kg disk, but with a 2kg weight in my right hand. Measurements: some progress on all zones. Another 30 min: this time, not much change. Another 20 min, also 2kg in the right hand, and supporting more with the left hand. Not much difference.
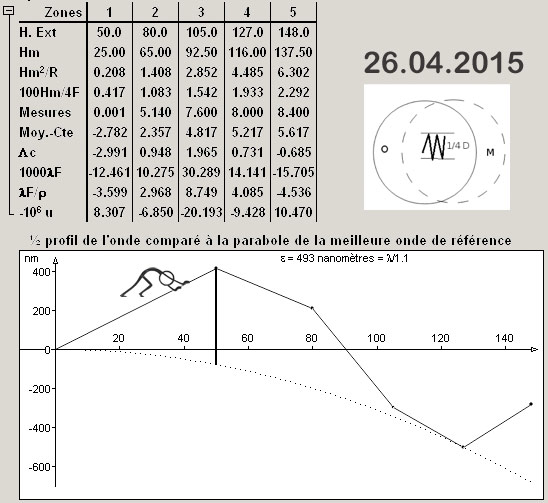
26.04 : warm press, 45 min TOT strokes W 1/4D zones 2-4. Small progress, assuming that the measurements of zones 1 and 2 are precise enough. Indeed, the center is too deep and the shades inside the windows of zones 1 and 2 are not even.

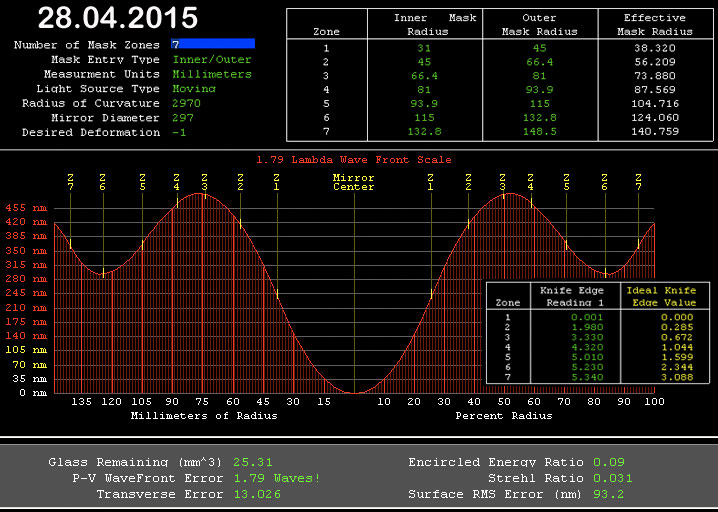
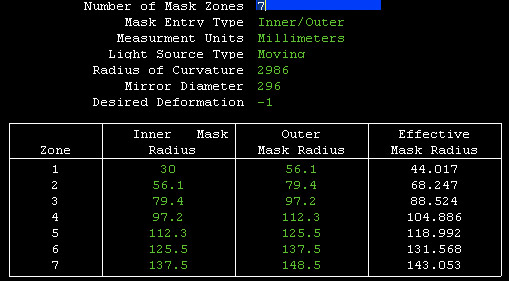
27.04.2015 : suggestion from Michel (SAR) : dividing zone 1 for better precision in the measurements. I have done a second smaller mask that I adjust on top of the existing one, that divides zones 1 and 2 in two zones. Total 7 zones. And indeed, a test run shows that it is much easier to make a precise measurement. Bulco spits out an error with 7 zones, so measurements from now on will be fed to FigureXP. Also, I realised I made an error in the earlier Bulco files: 'H ext' is the external radius, and I indicated the medium radius for zones 1-4.
28.04 : warm press. 30 min, TOT W 1/4 D as earlier, weight 2kg in right hand, supporting tool with left hand. Measurements : small change in the right direction.

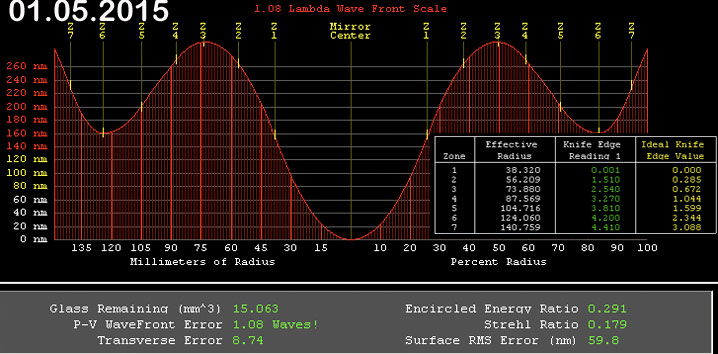
01.05.2015 : warm press. 3 times 1 hour TOT W 1/4D as earlier, with a 2kg weight in the right hand, supporting the overhang with the left hand and using less water than before. The work is harder, I really have to push the tool. After each hour, the mirror rests for 30 min before measuring. Very good progress on all zones each time. After 3 hours, (see FigureXP below), the surface is less than 300 nm from the parabola. NOW WE'RE TALKING BUSINESS !

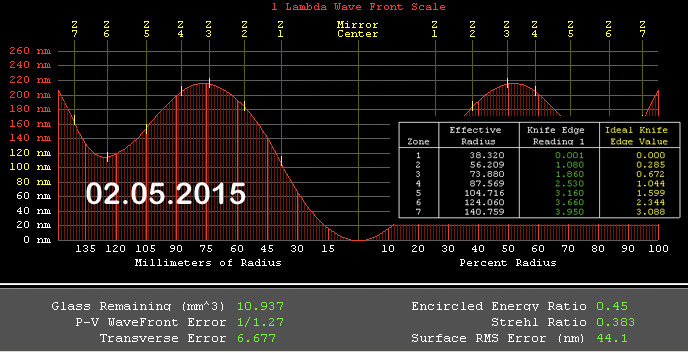
02.05 : SAR meeting. Warm press. Twice 45 min TOT W 1/4D as earlier, with a 2kg weight in the right hand, supporting the overhang with the left hand and using less water than before. The mirror is allowed to rest for 30 min before measuring. Same positive trend: approching 200 nm. Michel recommends measuring every 30 min to avoid going too far. New batch of cerium oxide (white).

03.05.2015 : Re-channelled the tool. Warm press. 30 min TOT 1/4D as earlier with tighter Ws on zones 2-4, with a 2kg weight in the right hand, supporting the overhang with the left hand and using less water than before. The mirror is allowed to rest for 30 min before measuring. Result : slight negative trend. May be strokes came too close to the center.
06.05 : Warm press. 30 min TOT 1/4D Ws on zones 3-5, with a 2kg weight in the right hand, supporting the overhang with the left hand. Result : positive trend, almost back to the results of 02.05.
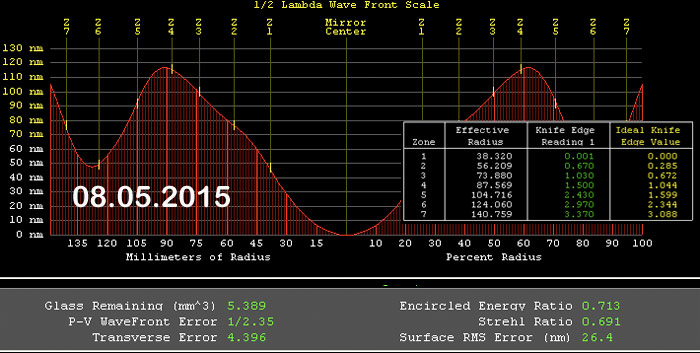
08/05 : Warm press. 3 times 30 min TOT W 1/4D as earlier, with a 2kg weight in the right hand, supporting the overhang with the left hand measuring after each run : nice progress, reached lambda/4. However, I noticed some scratches that were not there before. I think it's due to some black specks on the inside of lid of the cerium oxide jar. Thoroughly cleaned the tool. Waiting for new batch of cerium (15.05).

|
|
15/05/2015 : new batch of cerium
15-16/05 : remeasured and found that the 'hill' is about 220 nm, not 110 nm. Error in previous measurement ? More strokes in Ws on zones 3-4-5 twice around the table with a 2 kg weigth in the right hand, measuring carefully each time. Outcome seems to vary : sometimes it gets a little worse. In the end, got it down to 170 nm.
17/05 : tried a few runs using 'star' strokes suggested and described by Michel (same 2kg weight and twice around the table). After 3 times twice around the table : 130 nm.
24/05-03/06 : various attempts to reduce zones 4-5-6 ('star' strokes, Ws zones 4-5-6, and thumbs on zone 6). Improvement but surface has become less smooth
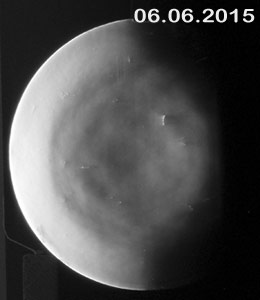
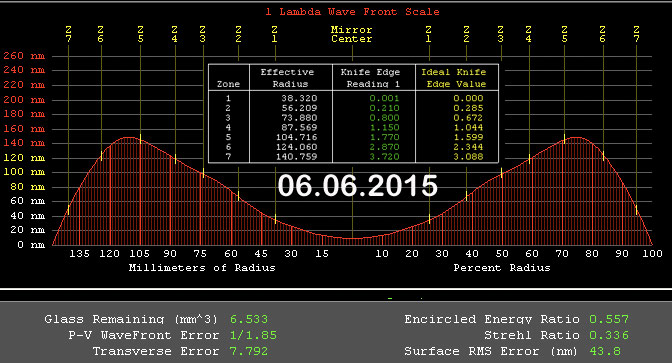
06/06 : SAR meeting. Recommendations from Michel: normal parabolisation strokes to reduce the surface irregularity. Twice 4 times around the table. More will be required to push outwards the higher zones. Measurements using 7 zones is conclusive, a new proper mask will be done. On this photo, the scratches created by the previous batch of cerium are quite obvious.
|

|
|

|
|
15-16/06 : made a new 7-zone mask in harder more rigid cardboard.
17/06/2015 : normal parabolisation strokes (4 times around the table) and measurements. That immediately made the mirror deeper. Tried with type III as described in Texerau : got deeper still...
18/06 : strokes in 8s TOT : still deeper. Strange. Probably deserves another go with a proper warm press
19/06 : warm press, strokes in 8s O/M, 2kg weight, 4 times around the table : looking better. The surface is smoother.
22/06 : cold press, strokes in 8s O/M, 2kg weight, 4 times around the table : going in the right direction.
04/07 : SAR meeting. Warm press, strokes in 8s O/M, 2kg weight, 45 min. Some signs of irregular zones. Overall shape not much improved.
July, August, Sept. : long break during the summer: quite a lot of cycling + moving appt meant that the mirror stayed in its box.
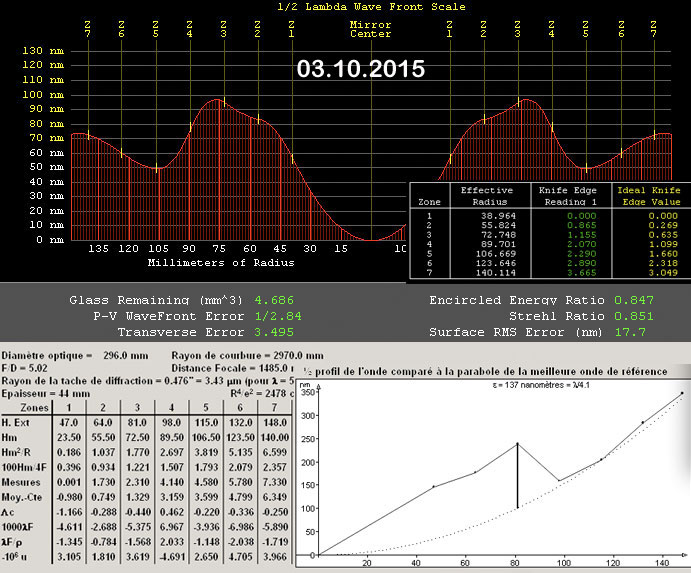
03/10/2015 : SAR meeting : warm press. 30 min strokes in 8s TOT. Measurements. 1h same strokes but alternating MOT/TOT every 15 min. Surface and shape better (see below). Advice from Michel: continue more of the same strokes, alternating MOT and TOT but with more time MOT to reduce the inner zones 1-4.
|
|

|
05/11/2015 : On Michel's advice, I made a new 7-zone mask. The current one had zones of equal size, and it is better to have zones whose size is proportional to the surface area they represent.
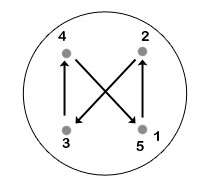
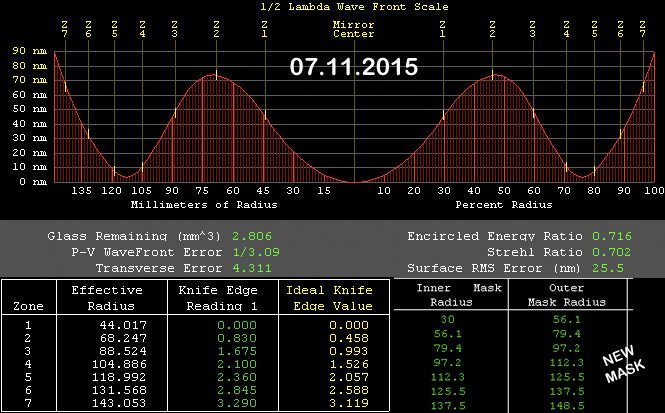
07/11/2015 : SAR meeting : warm press. 10 min MOT, 25 min TOT + 1kg weight in 8s. Measurements using the new mask. Same again. Measurements. Conclusion: not much change : zones 2-3 too high, zones 4-5 too deep. Suggestion from Michel: work doing 'star' strokes TOT as illustrated (the dot represents the center of the tool over zones 4-5, at 5 the mirror is rotated in one direction while I move one step in the opposite direction).
|
 |
|

|
05/12/2015 : SAR meeting. 15 min star strokes (MOT) : not much change. Once around the table with classic parabolisation strokes (MOT 2/3 D). Center slightly deeper. Same TOT twice around the table 5 times. Slight improvement. Got a batch of opaline.
13-14/12/2015 : As from now, working with Opaline (smaller particles than the previous batch of cerium oxide). Total of 10 times around the table W strokes on zone 2-3-4 (Texereau p. 81), checking every two turns. Not much change. I checked on two axis : consistent results.
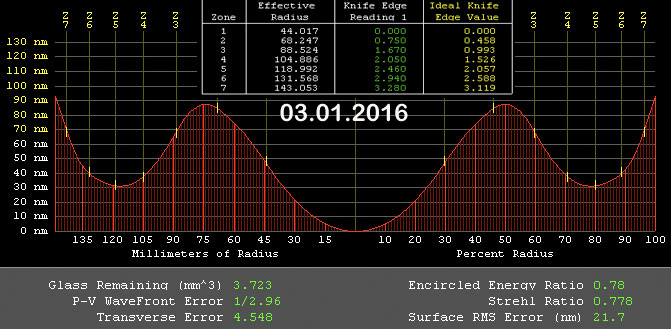
03/01/2016 Total of 4 times around the table W strokes on zone 2-3-4 (Texereau p. 81), checking every two turns. Not much change. Results very sensitive to measurements of zone 1: only 1/10mm makes a significant difference.
|
|
|

|
09/01/2016 : SAR meeting. Twice around the table W strokes on zone 3-4-5 TOT (Texereau p. 81). Improvement but zone 4-5 still too deep. Same but only on zone 3. Going the right direction: zone 2 decreasing. At home, same again on zone 2-3 (twice two times around the table).
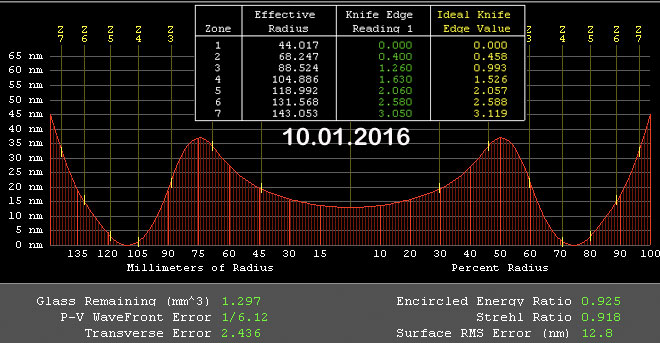
10/01/2016 : Same again on zone 2-3 (twice two times around the table). The opaline works more slowly than the previous batch of cerium, which is good at this stage. It mixes better with water and does not form a hard deposit when the mixture settles. This work (W stroke zone 2-3 with opaline) appears to slowly but surely shape the mirror closer to the ideal parabola.
|
|
|

|
16-17/01/2016 : Total of 5 times two turns around the table W strokes on zone 2-3 TOT (Texereau p. 81). Not much change. However, the surface is getting less smooth (zoning and irregularities). That means measurements are more difficult and less accurate. Worse : I bumped the mirror against the tap of the sink, as I was about to put it on its stand for cleaning. This knocked a piece of glass the shape of a clam, about 3x6 cm on the surface, about 4 mm thick.
|
|
|

|
06/02/2016 : SAR meeting. Michel checked the damage on the mirror. A careful look with the Foulcault instrument reveals a slightly darker zone 3-4 times the size of the damage. According to Michel, there is a risk that the glass has been weakened. I'll have to start over and grind the glass down until I reach the bottom of the 4 mm pit. A frustrating setback...
I stocked up on Carbo 40, 60 and 80. I'll have to prepare new shorter 70 cm planks to lower the polishing table. The plan is to grind alternating TOT and MOT in order to keep the current curve and remove 4 mm of glass over the whole surface.
|

|
2.8 RE-GRINDING (07/02 - 02/03/2016)
07/02/2016 : here we go again : 1h TOT and 1h MOT strokes 8 with coarse abrasive, using the same grinding tool as earlier (it is already at the correct curvature). See you soon, polished surface. For now, here comes the awful screeching noise.
At the beginning, the carbo does not attack the surface a lot, but after two hours, the surface is evenly unpolished. The work was done on the turn-table made by Laurent (SAR mirror workshop colleague). The abrasive used is Carbo 40 to start with, then another abrasive, bought by Laurent in a bucket of 25 kg (grains between 0.2 and 0.8 mm). It seems to be softer than the C40 (wets are shorter). It will allow us to save on C40 anyway (insufficient quantity considering the amount of work to do).
08/02/2016 : Chamfer redone. 1h TOT and 1h MOT. Progress is slow, but already the mirror is not as firmly held in its box as before.
08/02/2016 : Mirror tickness: 4.63cm. 1h TOT and 1h MOT. Progress is too slow judging by the small reduction in the thickness of the mirror and also but its surface, which is not as rough as with C40. Searching suppliers.
15/02/2016 : Ordered 5kg of Carbo 36 and 250g of Carbo 24 (from 'le centre des abrasifs' for 80 euros).
17/02/2016 : Carbo delivered. That was quick. Ready to gRRRRRind.
19/02/2016 : Working in the garage in the basement around the polishing table. For all the following work, the chamfer is maintained by doing one turn with the whetstone after every TOT web, before rinsing the mirror, taking advantage of the remaining carbo. Strokes are always 8, alternating MOT and TOT (+5kg and +2kg weight as from C80) every half hour. This day : 2 hours C24
20/02/2016 : 5h C36 (same for following days). The piece of glass that got knocked off measures 5.5 cm in length: the remaining hole is now down to 2.8 mm.
21/02/2016 : 5h. The dent now measures 2.1 cm in length. The mirror is 4.35 cm thick. Sagitta still 3.7 mm.
22/02/2016 : cut tiles for an additional layer. I don't recall smashing so many tiles last time, before obtaining some of the right size and shape for the edge of the tool.
23/02/2016 : glued the new layer of tiles (epoxy).
26/02/2016 : 3h. The dent now measures 1.7 cm in length.
27/02/2016 : 4h. Now working in the veranda. The dent now measures 1.2 cm in length. The chamfer is from now on done using a metal file, as the whetstone was wearing out very fast, whist not producing much of a chamfer.
28/02/2016 : 5h. The dent now measures 0.7 cm in length.
01/03/2016 : 2h. What's left of the impact now measures 0.4 cm in length.
02/03/2016 : 2h. What's left of the impact is barely noticeable. Ready for C60
2.9 RE-SMOOTHING (03/03 - 03/04/2016)
03/03/2016 : Clean-up. Moved from garage to the winter-garden.
04/03/2016 : Poured glue between the tiles to trap the carbo that was left-over
06/03/2016 : C60 3h. Some pits left.
07/03/2016 : C60 2h. One or two pits left.
09/03/2016 : sealed tool with epoxy, leaving just a shallow space between tiles.
14/03/2016 : C60 1h. 1 minor pit left. That'll do. On to C80. Clean up.
16/03/2016 : C80 2h (when TOT : 2kg weight from now on)
17/03/2016 : C80 1h. Noticed small bits of tiles coming off the sharp edges.
18/03/2016 : made a chamfer on all tile edges (using a 2 cm grinding wheel mounted on the drill/driver).
19/03/2016 : C80 1h30. Good enough. Clean-up. Ready for C120. C120 1h
20/03/2016 : C120 3h. Some stubborn little pits
21-24/03/2016 : redone chamfer of all tiles. Now alternating MOT and TOT every 15 min and checking the surface every half hour.
25/03/2016 : C120 2h
26/03/2016 : C120 30mn. Surface OK. Clean up. C230 3 h.
27/03/2016 : C230 2h30
29/03/2016 : C400 2h. Alternating every wet from here.
30/03/2016 : C400 2h
31/03/2016 : C400 2h
01/04/2016 : C400 2h
02/04/2016 : C400 1h. Surface OK. Clean up.
03/04/2016 : C600 1h30. 12 wets. clean up. W9 12 wets. Surface OK. Clean up and moved setup in the living room. Brought back polishing gear.
2.10 RE-POLISHING (05/04-06/05/2016)
05/04/2016 : pressing with slightly warm mirror. 2h, strokes in 8 using white cerium (not opaline), alternating TOT and MOT every wet, which last about 10-15 min.
07/04/2016 : 2h
09/04/2016 : 4h
10/04/2016 : 5h
12/04/2016 : 2h (with 2kg weight for TOT). Total up to here = 15h
23/04/2016 : warm press with a sheet of baking paper. 4h. Still some 'haze' but the surface is reflective enough to look at it with the Foulcault instrument. It looks good, it's near-spherical (just a small turned up edge). The radius of curvature is 2987 mm.
24/04/2016 : 4h
25/04/2016 : 2h30. Turned-up edge, some zoning.
26/04/2016 : 2h slow strokes W 1/3D alternating 10min MOT / 20min TOT. Still some haze, less zoning, turned-up edge persists
27/04/2016 : 2h same as yesterday, 75% of the time TOT. Better still.
28/04/2016 : 2h now with opaline. The cerium mixture with water has a tendency to sediment in a hard deposit, or dry into a crust. The opaline is thinner and does not sediment (a 3-month-old mixture was still ready to use). Alternating TOT for 20min and MOT for 10mn: 1h30 doing W strokes 1/3D with the 2kg weight for TOT as earlier, and the last 30 min doing 8s without the weight as it got really hard to push. The surface is clearly improving, but the turned up edge is still present. More TOT needed.
29/04/2016 : 2h Ws and 8s, alternating 30 min TOT and 15 mn MOT. Turned up edge + center too deep.
30/04/2016 : 4h Ws and 8s, alternating 30 min TOT (+2kg) and 10 mn MOT. Using opaline, it's to hard to push. To avoid an irregular surface, I use a mixture of opaline and cerium white : it glides more smoothly. Result: bit less turned up edge but center too deep surrounded by a higher zone. The edge is almost polished, but there remains some haze elsewhere. I read in various sites that MOT can help tackle a central hole. As there is still some haze in the center, it's worth a try. Total 39 hrs
01/05/2016 : 4h MOT strokes 8 less than 1/3D, including 2h rotating the other way around and being careful not to 'swing' the miror (forgot about that ... could be a cause of zoning). Every 30min, the tool is rotated. Result: ah ah, things changed. Setting the external zone flat reveals a middle zone that's too high and a central hole (1.2 mm difference). Still some haze except outer zone.
02/05/2016 : 2h MOT strokes 8 less than 1/3D.
03/05/2016 : 2h MOT strokes 8 less than 1/3D opaline
04/05/2016 : 2h MOT strokes 8 and W 1/3D opaline. Shape has clearly changed, 2mm difference between external and central zone. Haze left is barely visible. Tool will need re-channeling
05/05/2016 : 4h MOT strokes 8 1/3D opaline. Going much more smoothly in the last 2 hrs. Shape much better : 0.8mm difference between outer zone and the broad raised dome around a small central depression. No more visible haze.
06/05/2016 : 4h M/O strokes 8 1/3D. I could really feel that the strokes were regular and smooth even with little opaline and water, as opposed to a few days ago when it needed a creamy amount at all times. And indeed, the surface is polished and spherical. There's a little too much turbulence in the appartment for a careful surface check. Radius of curvature 2986 mm.
2.10 RE-PARABOLISATION (started 07/05/2016)

07/05/2016 : SAR meeting. First, just twice around the table 4/5D MOT : small change. Then twice 4x around the table (each time about 15 min). At home two table turns 2/3D and 1 more 4/5D.
08-10/05/2016 : about 20 turns of the table doing normal parabolisation strokes, plus some Ws on zones 2-3-4 too high. I thought I might check the outcome with Bulco and realised that I had been using values multiplied by 2 in FigureXP, which is wrong since it has a parameter for mobile source. So... more parabolisation strokes ahead.
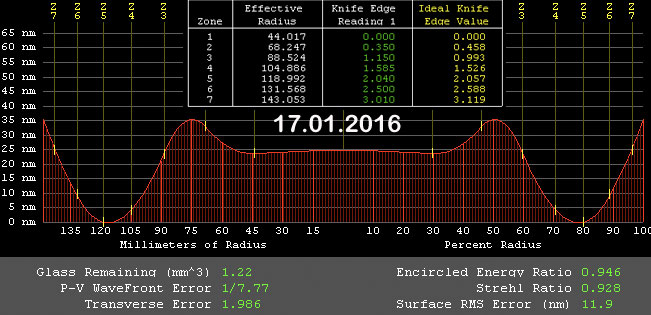
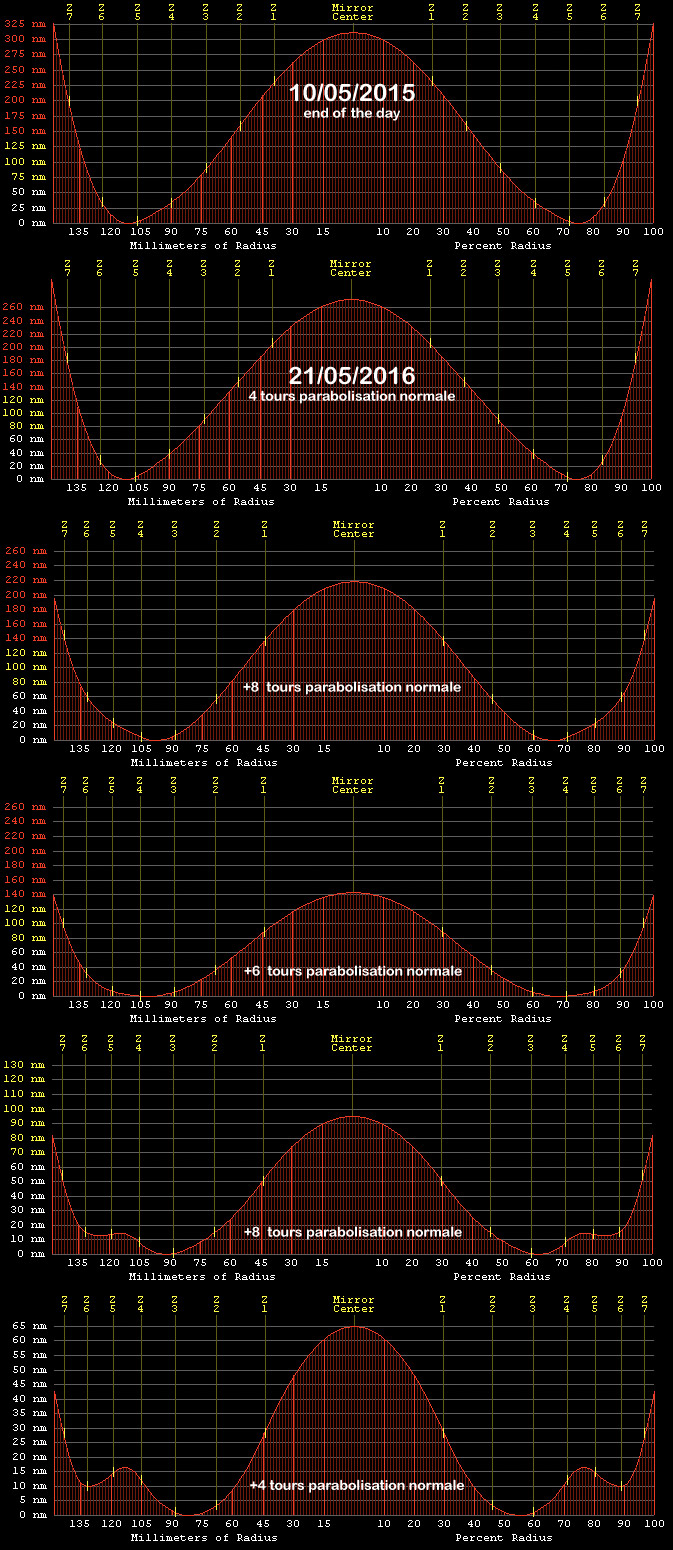
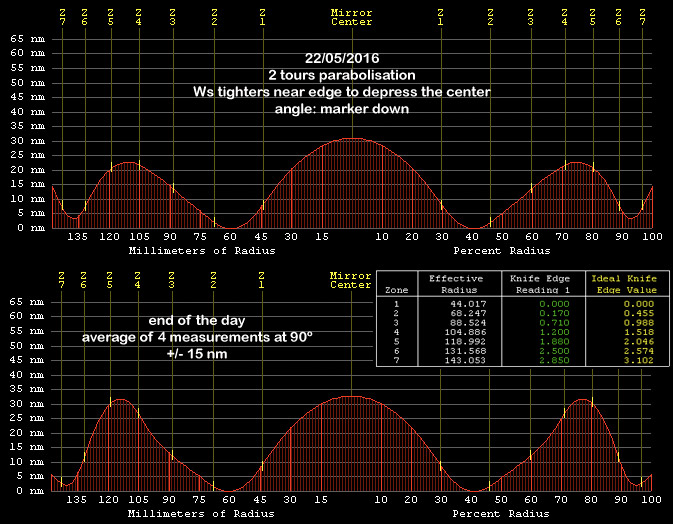
21/05/2016 : managed to make good progress towards the parabola, avoiding a raised middle zone. See below FigureXP results:

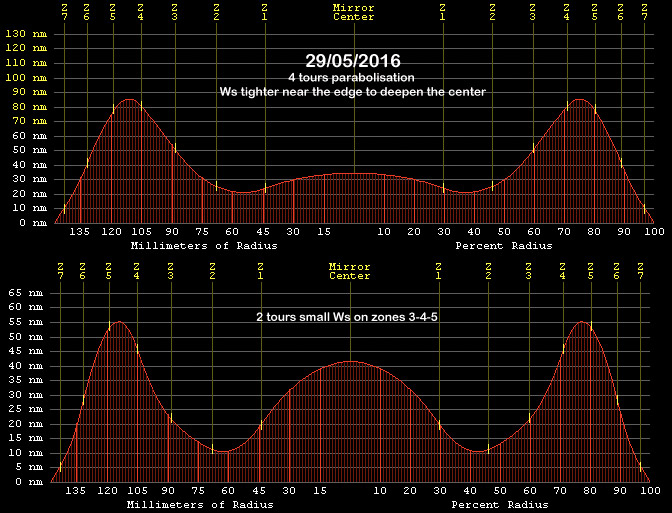
22/05/2016 : started with parabolisation strokes to deepen the center (twice two turns of the table). It worked but now zones 4-5 are too high and the center is still not deep enough. Several attempts doing 8s MOT (2x and 4x around the table) : no big change in the shape.

29/05/2016 : tried to deepen the center : that worked but it raised zones 3-4-5. Tried to flatten zones 3-4-5 : that worked but it raised the center.

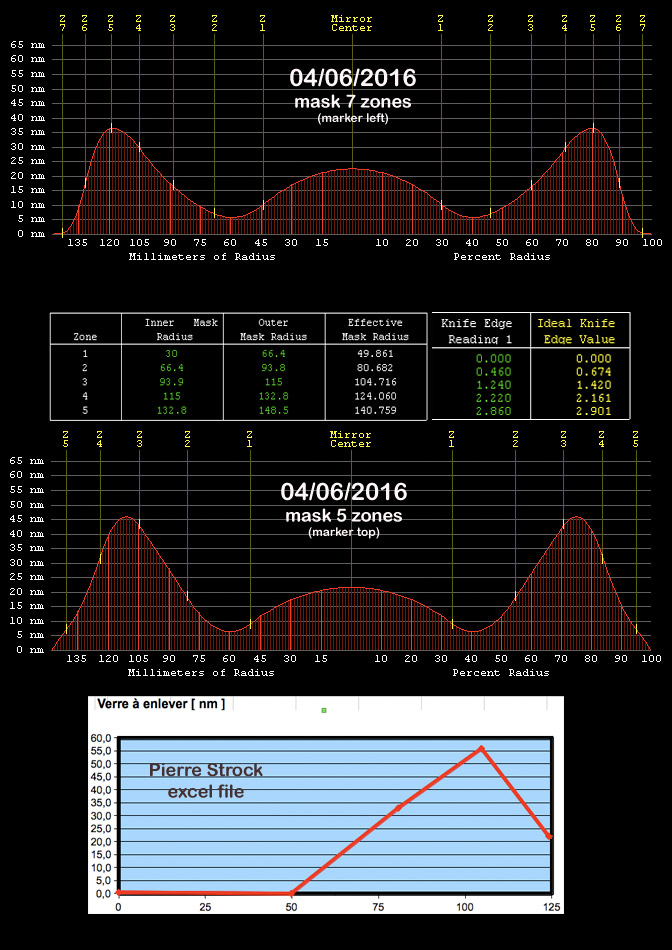
04/06/2016 : SAR meeting. Michel measured, then I also checked with the 5-zone mask so we could feed the results into the Pierre Strock excel file and how it correlates with FigureXP. Michel confirms there is not turned-down edge. I have a marker on the edge so I know the position of the mirror on the stand. Another measurement at 90deg shows that there is no astigmatism. Recommendation : normal parabolisation strokes 2/3D, two turns of the table.

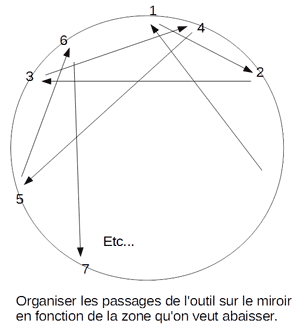
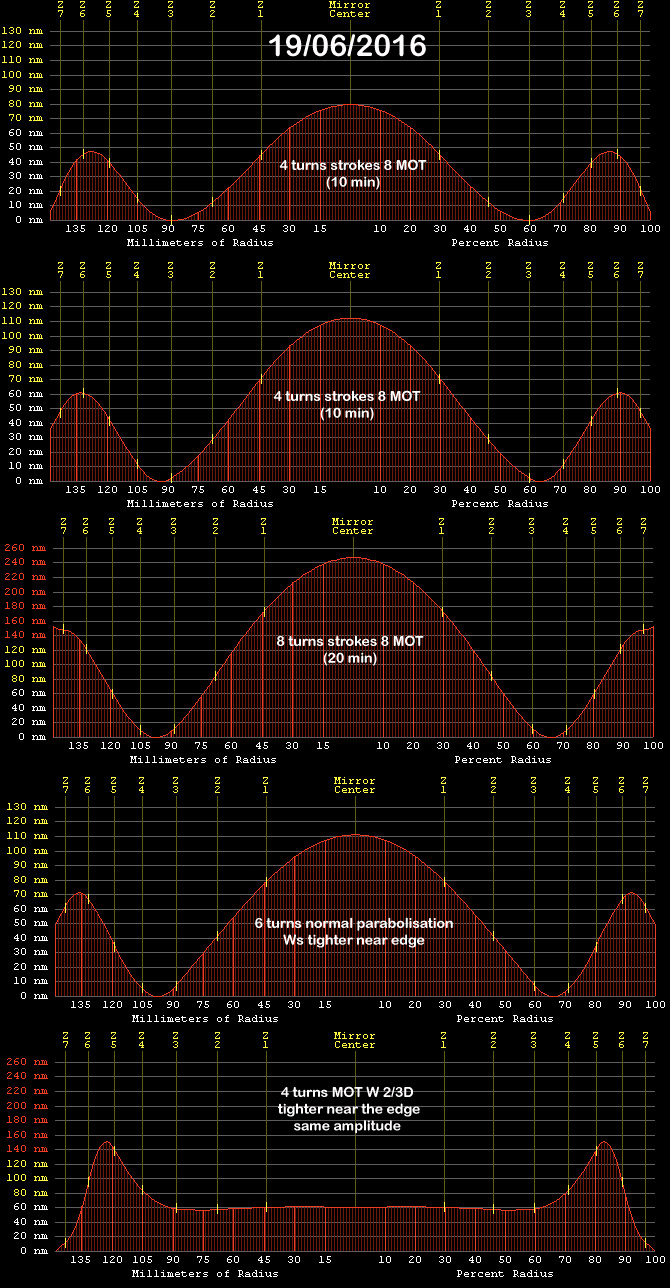
18-19/06/2016 : warm press. Normal parabolisation strokes 2/3D, two turns of the table: not much difference. Star strokes 5 minutes (see diagram below) : not much difference. Decided to go back towards the sphere and start over. That surely got rid of the higher zones I had at 70-80% D but after some normal parabolisation strokes with tighter Ws near the edge to depress the center, a higher zone 5-6 reappears. Looks like I flatten the outermost zone even though I am trying to work only on the center. I tried something new : I keep my W the same amplitude, about 2/3D max from edge to edge. Interesting result. Next : some 8s MOT I think...

Star strokes (the center of the tool moves over the zones that need to be worked)

|
|
2.x ALUMINISATION (not started)
CONCLUSION
|

